
For the War to Come: Iron Banner Quest
Check out our complete guide to the For the War to Come Iron Banner quest during Season of the Lost.
Iron Banner is back and with it comes a new set of Iron Banner themed armor and 2 new legendary weapons. There’s also a new Iron Banner quest for Guardians to chase after during Season of the Lost in the form of For the War to Come. Like previous Iron Banner quests, players will have multiple sets of requirements that need to be completed before moving onto the next step. These can be anything from final blows with a certain weapon type to capturing zones and everything in-between.
Some of these steps can be quite grindy, but luckily, players have until the end of the season to complete this quest. That gives everyone roughly 6 months to mark this one off the to do list.
Iron Banner is Destiny’s version of endgame PvP and it’s no cakewalk. Players bring their best weapons and loadouts to earn tokens so they can redeem them for high-stat armor pieces and potentially god roll weapons. This season is especially crazy because of the rolls players can get on the Forge’s Pledge pulse rifle and Peacebond sidearm. If you aren’t used to playing competitive PvP in a power level enabled environment, you might have some trouble completing the For the War to Come questline.
However, we’ve broken down each step of this quest and added some tips to help you finish this before the Season is over.
For the War to Come Quest Guide
One thing to keep in mind is that certain requirements, like capturing zones, are repeated across multiple steps of this quest. Don’t panic. You don’t have to start over from scratch each time. Your progress from the moment you stepped foot in Iron Banner will carry forward so it’s possible to complete future steps of For the War to Come before you get to them. So, be sure to play the objective and capture those zones!
QUICK TIP! If you’re playing Iron Banner solo, do not go into the regular Iron Banner Queue. You’ll be a filler and going against almost full fireteams the entire time. This will make completing these steps significantly harder than they have to be. You’ll want to go to the Freelance Iron Banner queue so you can be matched with a full lobby of solo players.

Step #1
- Defeat 30x Guardians
- Capture 10x Zones
- Get 15x final blows with energy weapons
The first step of For the War to Come is very straight forward. All you have to do is play the game mode, and the objective, and you’ll complete this step within a handful of games. The limiting factor will be how quickly you can pick up those final blows with an energy weapon. We strongly recommend that you use a primary weapon in that slot so you can take advantage of the new infinite ammo changes.
Tips
- Cap every zone you see and cycle from capture point from capture point
- Equip a primary weapon in your energy weapon slot
- Use armor mods that improve that weapon’s performance, i.e. reloader, targeting, aim mods
- Stay close to your teammates so you can teamshoot your opponents in 2v1, 3v1, etc. engagements
- Focus on putting yourself in advantageous gunfights, i.e. don’t rush face first into the other team
Now, you can absolutely use a special weapon in your energy slot, but this is going to drastically slow down your progress. You only get a couple rounds of special ammo when you spawn so you’ll have to secure kills and pick up ammo from your opponents, which is easier said than done. You’re far better off equipping a primary energy weapon and staying close to your teammates to get clean up kills with your primary weapon.
And, if you use an energy Pulse Rifle, you can make progress on the next step of this quest.
Recommended Weapons
- Palindrome
- Vulpecula
- Gridseeker
- The Third Axiom
- Contingency Plan
- Stochastic Variable
- Huckleberry
- Graviton Lance
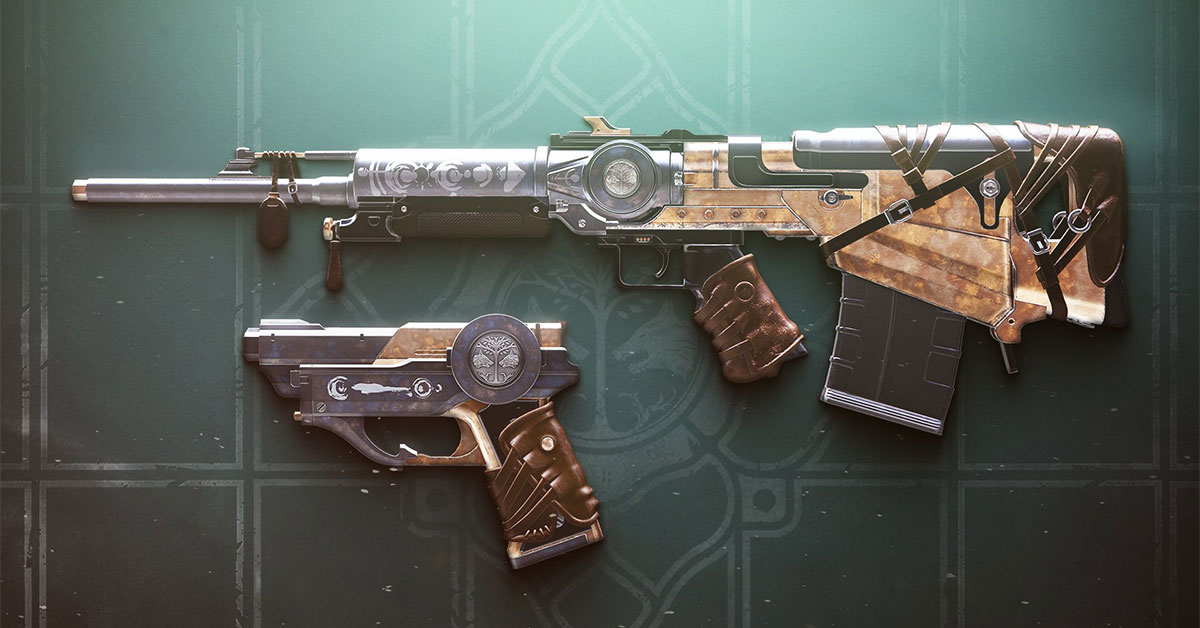
Rewards: Forge’s Pledge and Iron Forerunner class item
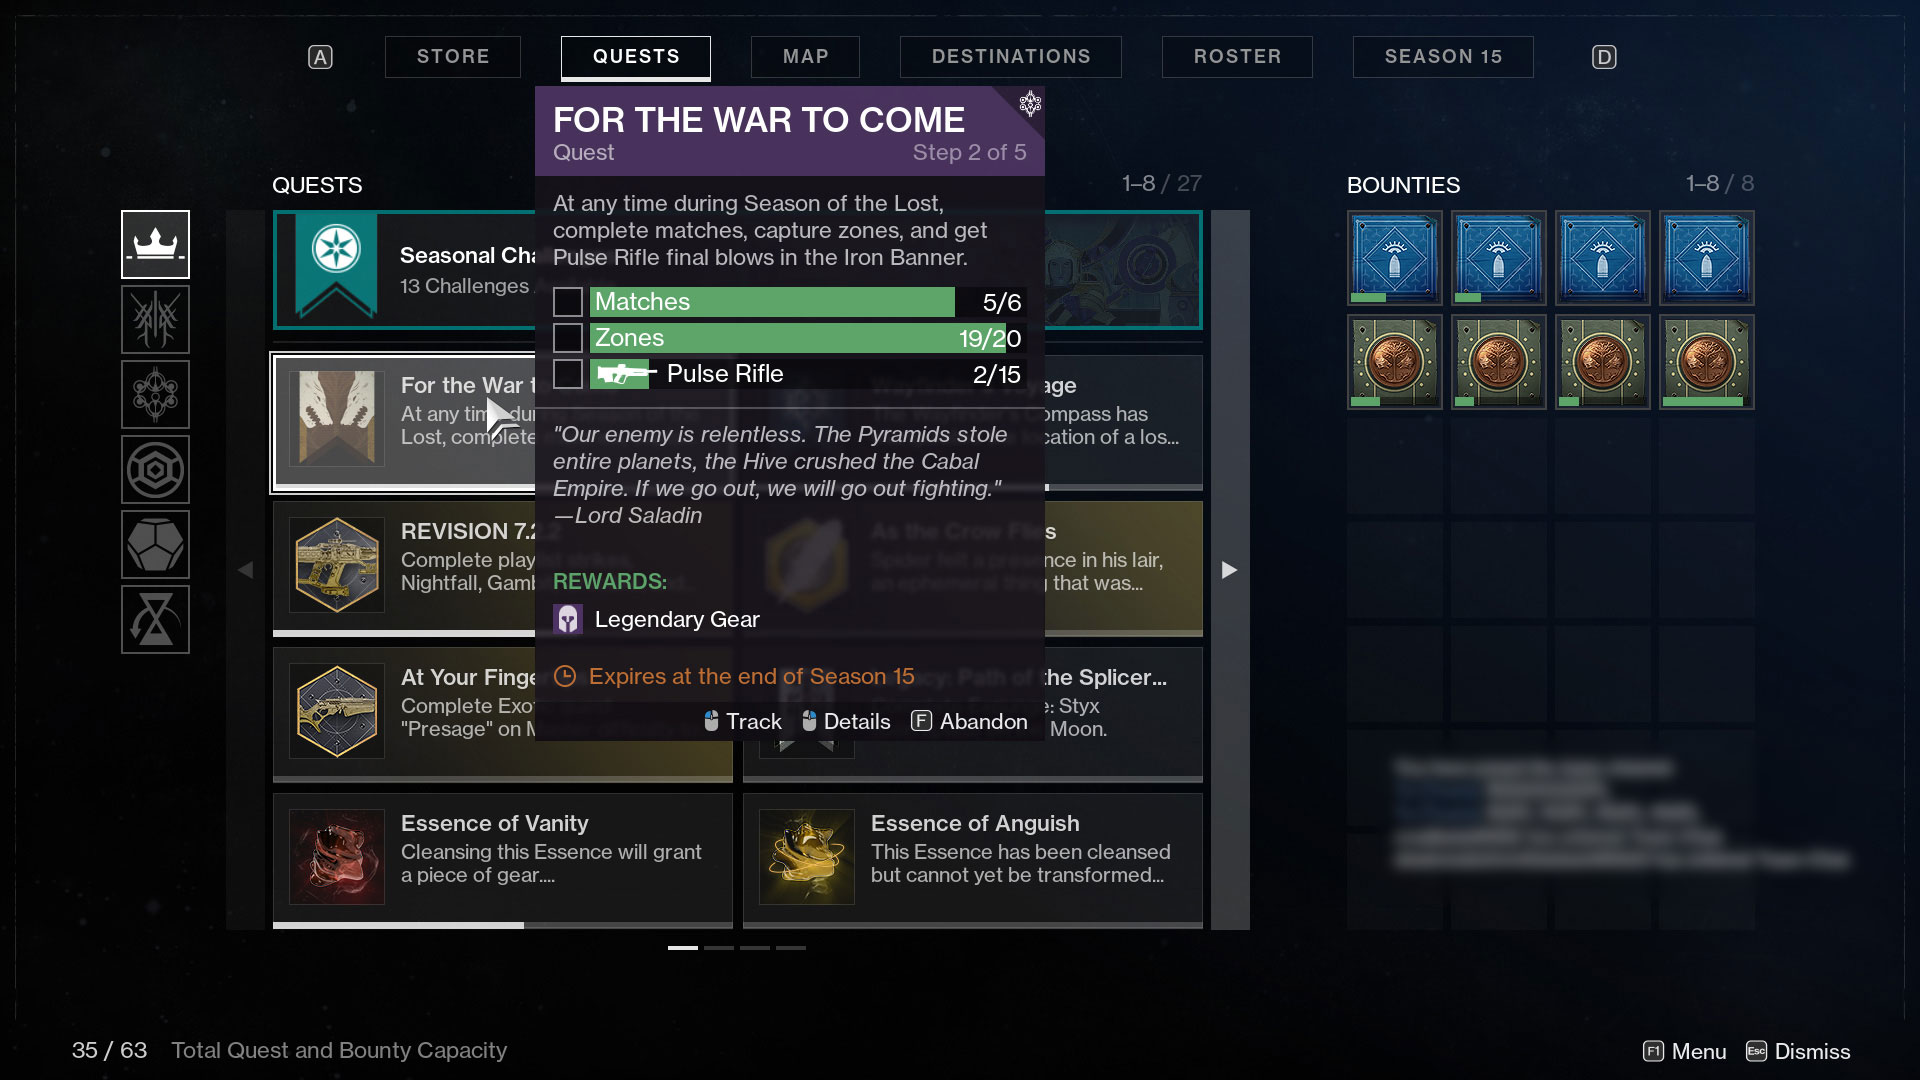
Step #2: Get final blows with Pulse Rifles
- Win 6x Iron Banner matches
- Capture 20x zones
- Get 15x final blows with Pulse Rifles
The 2nd part of this quest is basically an extension of the first except that you need to get final blows with a Pulse Rifle rather than any weapon. And any progress you made beyond the first set of requirements will be carried over to this one. We put together a short list of Pulse Rifles that do well in the current sandbox below so if you have one of those, be sure to pull it out of the vault and infuse it to max light. You can also try out your new Forge’s Pledge that you earned from the first part of this quest (if you happened to get a solid roll on it).
Tips
- Use your Pulse Rifle as much as possible to secure final blows
- Stay away from corners and try to hold longer sight lines to make full use of your weapon’s range
- Cycle from zone to zone around the battleground
- Try to push for the 3 cap to activate The Hunt and build a bigger lead
Hopefully you’ve already won a couple of matches before hitting this step since Iron Banner can be quite unforgiving. I’ve gone entire nights without winning a single match, but focusing on capturing control points and activating The Hunt will go a long way to helping your team secure the wins you need.
Recommended Weapons
- Gridseeker
- Forge’s Pledge
- Time-Worn Spire
- The Third Axiom
- No Time to Explain
Rewards: Iron Forerunner leg armor
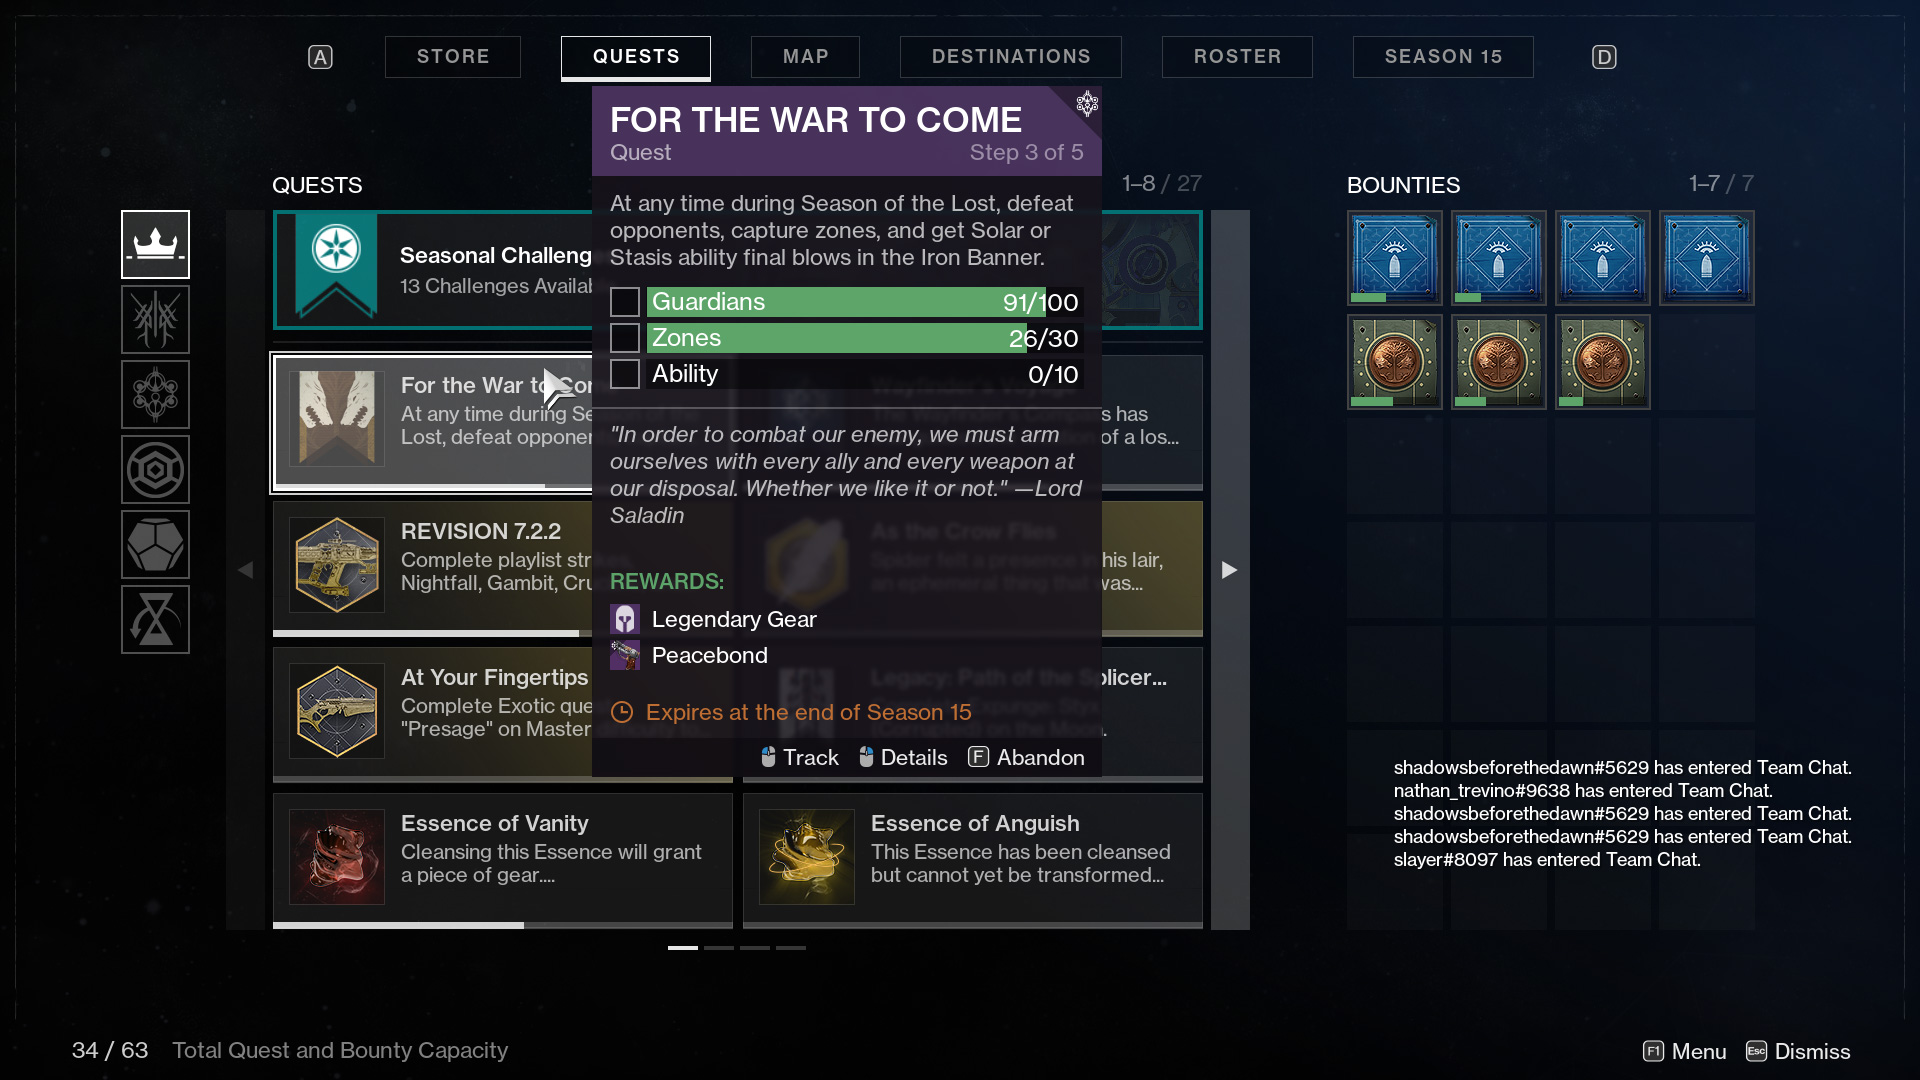
Step #3: Get defeats with abilities
- Defeat 100x opponents
- Capture 30x zones
- Get 10x final blows with abilities
Don’t worry about about the 100x defeats part of this quest. Your progress from the earlier steps will carry forward and chip away at this number. What’s also good to remember is that these are defeats, not final blows, so getting assists will move the needle here too. Honestly, you’ll most likely complete first first two parts before locking in the ability kills.
Tips
- Keep cycling from control point to control point and capping as many zones as possible
- Be hip to hip with your teammates to secure those defeats
- Equip a subclass that has high ability uptime
- Adjust your armor mods to enhance those abilities
- Proactively use your abilities to secure final blows
If you’re banking on your Super to get ability kills, you might be disappointed. Most supers have had their damage resistance and regen nerfed so they’re easier to shut down than ever before. Most can even be one shot with a sniper rifle so you can’t just rush and get your kills handed to you. And if you don’t get shut down, there’s a lot that can go wrong:
- You can’t find a single opponent to defeat
- Get pinned down behind cover by multiple opponents
- Slowed with a Stasis grenade
- Neutralized with a Tractor cannon
- Mercy’d before you even get your Super
Don’t get me wrong, it’s completely possible to pick up 4+ defeats by popping your Super at the right time. However, Supers have a ~4 minute cooldown if you’re running 100 intelligence and it can be faster if you’re defeating enemy Guardians. However, your melee and grenade ability cooldowns can refresh 5 times or more in the same amount of time, and you can get multi-kills with each of them if you’re running the right build.
Recommended Subclasses
- Titan
- Sunbreaker: Code of the Devastator (Middle Tree) + Wormgod’s Caress OHK Hammer Build
- Hunter
- Revenant: Withering Blade + Athrys’s Embrace Build
- Warlock
- Shadebinder: Bleak Watcher Stasis Turret Build
Rewards: Peacebond sidearm and Iron Forerunner gauntlet armor

Step #4: Get Sidearm kills
- Get 15x final blows with your Super
- Capture 40x zones
- Get 15x final blows with Sidearms
By this point, you shouldn’t have to worry about capping zones anymore. The Sidearm and Super final blows will be your main focus on this step. Sidearms are in an alright place in the Crucible right now, but you’ll have to be in close to be in their effective range. This puts you in shotgun range so you’ll need to pick your fights wisely so you aren’t rushed by an ape. There are some strong sidearms that will punish Guardians for rushing you and you can find that list below.
Like I touched on in the previous step, supers have a long cooldown and you may only get one of them per match, or none if you get Mercy’d. It’s possible to get 2 in a match if you’re running a high int build and scoring a good number of defeats. However, you’ll need to get 15x final blows with them, not defeats, so it’s important to pick the right time to pop your Super.
Recommended Subclass
- Titan: Striker, Code of the Juggernaut (Bottom Tree)
- Hunter: Gunslinger, Way of the Outlaw (Top Tree)
- Warlock: Stormcaller, Attunement of the Elements (Bottom Tree)
You’ll want to pick a roaming Super, that isn’t Behemoth, to pick up as many final blows as possible. While one and done Supers like Nova Bomb and Blade Barrage are great, you don’t have the luxury to hold them so you can pick and choose the right moment to drop it. Once your Super is up, you need to use it ASAP so you can start building your next one.
Recommended Weapons
- Peacebond
- Brass Attacks
- The Last Dance
- Devil’s Ruin
- Traveler’s Chosen
Rewards: Iron Forerunner chest armor

Step #5: Go back to Lord Saladin
You’ve done it. It’s finally over. You can return to the tower and collect your reward for finishing For the War to Come. Select the Tower from the Director and visit Lord Saladin in his usual place to close this one out.
Reward: Iron Forerunner helmet armor

Kenny Empey
Kenny is a lifelong gamer that enjoys writing in-depth guides for RPGs, JRPGs, strategy, and FPS games. You can follow him on Twitter, YouTube, or Twitch to stay up to date with the latest content and guides from ArcadeHaven.io


